QuickScan - FAQ
Frequently asked questions:
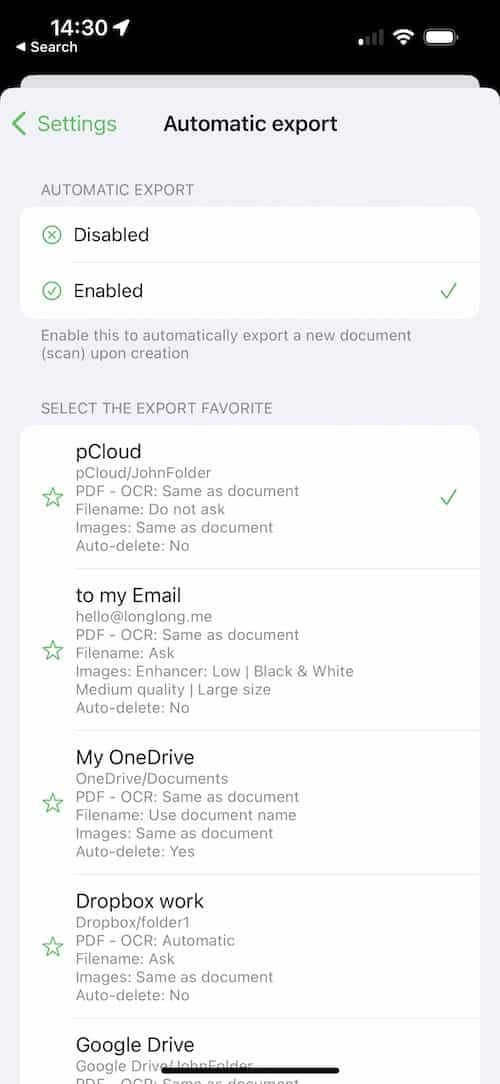
Tip #1: Automatic export
QuickScan allows you to trigger an automatic export once you are done scanning (i.e. pressed the Save button in the camera view).
To do that:
- Make sure you have at least one Export Favorite created
- Go to Settings > Automatic Export
- Enable automatic export
- Select the Export Favorite to be used when QuickScan will trigger the automatic export
Note: Every new scan will be automatically exported to the configured Export Favorite, unless the scan has been triggered from a widget/shortcut with another Export Favorite associated. See further for more details.
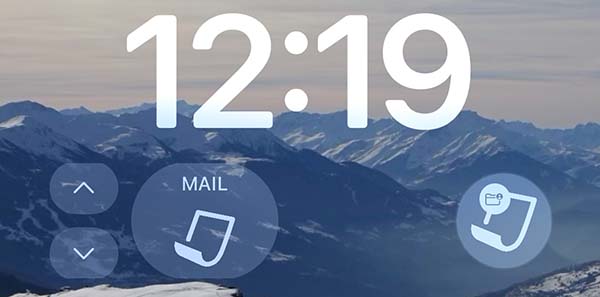
Tip #2: Widgets/Shortcuts
Widgets play an important role in using QuickScan efficiently. You can create multiple widgets on your home/lock screen. Each widget can be associated with an Export Favorite, such that QuickScan will process and export every new scan initiated with that widget, to the associated Export Favorite.
This allows you to immediately archive (i.e. upload) your scans at the right place.
For example you could have a widget for:
- Your professional expenses, that should be uploaded to your work Dropbox, in PDF, with OCR, in Black & White, named with today's date, example: 2023-04-03-11h10_work_expense
- Your shopping tickets, that should be uploaded to your family iCloud Drive, in PDF, with OCR, in colors
- Your travel tickets, that you want to send by email immediately, as a JPG image
- ...
See the widgets section for more information
Note: Siri Shortcuts work the same way as widgets (they can have an Export Favorite associated). The difference is that they allow you to trigger a scan with your voice, using Siri. Example: "Hey Siri, scan for work".
See the widgets section for more information
An Export Favorite is an export destination (ex: your Dropbox) associated with settings of your choice (example: black & white filter applied, OCR, specific filename).
When exporting a document (a scan) to a Favorite, the settings are applied and the document is exported to the configured destination.
Tip: you can associate a widget with an Export Favorite, to trigger an export immediately after the scan initiated by tapping the widget
To create an Export Favorite:
- Go to Settings > Export Favorites
- Tap the '+' button on the top-right corner
- Select a destination for the exported documents
- Then on the next screen: configure the name and other settings, according to your needs
To adjust the exported file size:
- In the list of scans, select the scan to adjust
- In the document view (the one showing all pages of a scan), tap on the Image Settings icon (
 ) located in the bottom bar.
 - Adjust the image quality and image size. These settings have an important impact on the exported file size.
- Tap on Done (top-right of the screen). The exported file size is automatically estimated, and displayed at the top of the screen.
Tip: You can adjust the default image settings for every new document in QuickScan > Settings > Image Settings
To access the recently deleted scans:
- In the list of scans, tap the 3-dots menu on the top of the screen
- Select 'Recently deleted'
- To restore (or permanently delete) a scan, press the button with the 3 dots next to it. Alternative: long press on that scan
Tip: The deleted files are kept for 24 hours by default. The duration can be configured under Settings > Other Settings
QuickScan Enterprise is the required licence for users that use the app professionally.
Otherwise they are functionally the same. There are no donations in QuickScan Enterprise. The zero data collection policy is the same.
QuickScan Enterprise is available in Apple Business/School Manager, and is eligible for the Volume Purchase Program.
Export Favorites
An Export Favorite is an export destination (ex: your Dropbox) associated with settings of your choice (example: black & white filter applied, OCR, specific filename).
When exporting a document (a scan), you have the possibility to choose the destination, or to export to an Export Favorite.
Tip: you can associate a widget with an Export Favorite, to trigger an export immediately after the scan initiated by tapping the widget
iCloud Drive, Dropbox, OneDrive, WebDAV, Google Drive, pCloud, NextCloud, NAS, SMB, SD, Email, Paperless-ngx, DEVONthink ... and many more by using WebDAV.
Yes! This is called an Export Group. It is available starting with QuickScan 8.3. To create an Export Group, go to Settings > Export Favorites > Add > choose Export Group. You can then configure the Export Group and select the Export Favorites that are part of this group.
This is because you are trying to select a 3rd party file provider that does not fully integrate within the Files.app, therefore, preventing iOS (and QuickScan) to select that destination. As a workaround, you can use WebDAV, because many 3rd party file providers support it.
See the Widgets section.
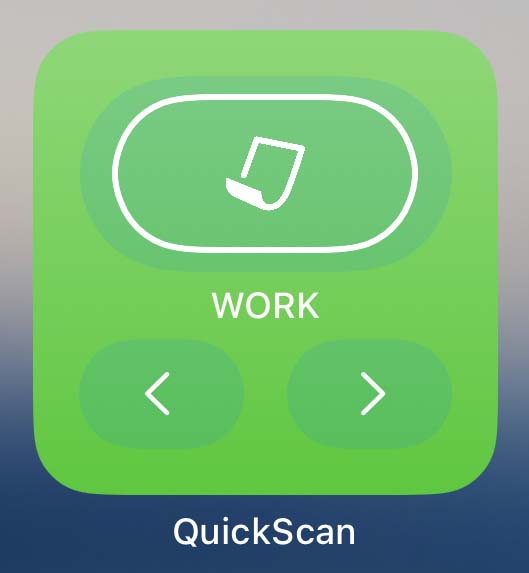
Widgets & Controls
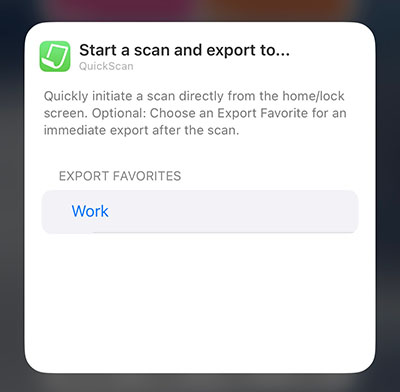
Widgets & Controls (Control Center) play a crucial role in QuickScan, helping you boost productivity. They are available for your home screen, lock screen, Control Center and Action button. A widget allows you to initiate a scan directly from the home screen, lock screen, Control Center, or Action button.
Optional productivity tip: A widget can be configured to work with an Export Favorite. When you trigger a scan using such a widget, the associated Favorite will automatically export your scanned documents as soon as the scanning is complete.
QuickScan offers widgets for the home screen and the lock screen.
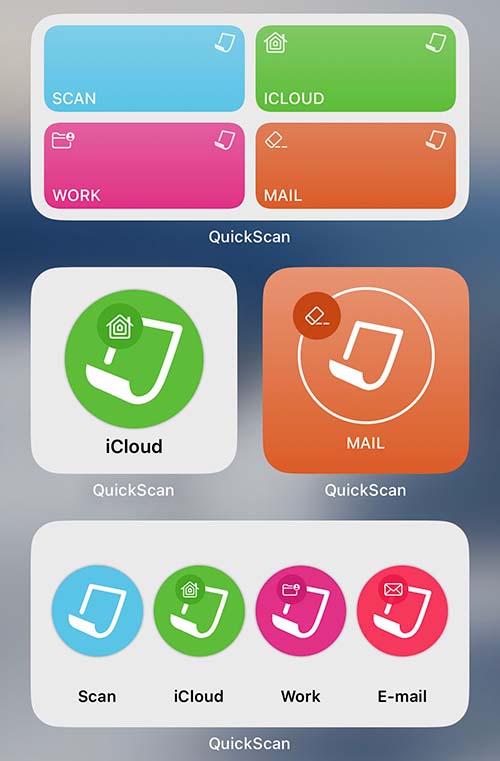
With iOS 17, QuickScan offers interactive widgets, allowing you to select the Export Favorite (destination + document processing) directly from the widget.
- Add a widget on your home / lock screen. See Apple's doc.
- Edit your widget (long-press on it), then tap on 'Choose' and select the desired Export Favorite in the list.
- The Export Favorite's icon, color and name will be applied to the widget
Note for lock screen: Due to space/color restrictions, only the icon will appear on lock screen widgets -
Tap on the widget > Scan > Tap save > The scan is processed and exported according to the Export Favorite
Note: if you do not associate an Export Favorite, the scan will be saved into QuickScan. If auto-export is configured within QuickScan > Settings > Auto-export, the export will happen, just like if your started the scan directly from the app.
Signatures
QuickScan allows you to easily add one or more signatures to your documents. Signatures can be created using your finger, an Apple Pencil, or by importing existing ones.
The functionality is very flexible: you can resize the signature and even change its color when applying it.
To create a signature:
- Go to Settings
- Scroll down and tap on 'Signatures'
- Tap on the '+' button in the top-right corner
- Choose how you want to create a signature and simply follow the instructions
To apply a signature on a document:
- Select a document in the list of Scans
- Tap the page of the document where you want to apply a signature. The page will now appear zoomed in.
- Tap on the signature icon in the bottom bar (or using the menu in the top-right corner > Add signature...). If you don't see the bottom bar, simply tap on the page to make it appear.
- Select the signature you want to apply
- Move and resize as needed
- To change the color of the signature, tap on the 'palette' icon in the bottom bar
- Tap ‘OK’ to save. You can still change it later.