QuickScan is a free scanner app for iPhone and iPad, and Paperless-ngx is one of the places it can send your documents. It uploads them through the Paperless-ngx API, much like a file you drop into the web interface, so your server treats them like everything else: OCR if needed, then tags, correspondent, document type and workflows.
What you need
- A Paperless-ngx server your iPhone can reach. QuickScan needs HTTPS with a valid certificate, except on your local network, where plain HTTP works too.
- Your Paperless-ngx username and password, or an API token.
- QuickScan, free on the App Store.
How to connect QuickScan to Paperless-ngx
1. Add Paperless-ngx in QuickScan
In QuickScan, open Settings and tap Export favorites, then Add... and Export Favorite. Pick Paperless-ngx from the list of destinations.
2. Connect to your server
Enter your server's address, with the port if it isn't the standard one: https://paperless.example.com, for example, or http://192.168.1.20:8000 at home. Then enter the username and password you use for the Paperless-ngx web interface, or an API token, and tap Connect. QuickScan checks that it can reach the server before you go on.
A token keeps your password out of the app. It's also the way in if your account uses two-factor authentication, because Paperless-ngx doesn't accept a password from apps for those accounts. To create one, open the user menu at the top right of the web interface, choose My Profile and click the circular arrow button. If your phone is ever lost, the same button gives you a new token, and the old one stops working.
If your server sits behind a proxy that asks for a client certificate, add it under Client certificate as a .p12 file.
3. Name it and save
Give the favorite a name you'll recognize, like Paperless, and tap Save. The settings under the name apply to everything you send with it: file name, OCR, image quality and file format. Leave the format on PDF, the default, so each document arrives as one file, however many pages it has.


Send a scan to Paperless-ngx
Tap the export button next to a document, switch to the Export Favorites tab and tap your Paperless-ngx favorite. QuickScan makes the PDF on your iPhone, with the OCR text inside if OCR is on, and uploads it. A green banner tells you when the transfer is done. The document shows up in Paperless-ngx once the server has processed it.
Upload every new scan automatically
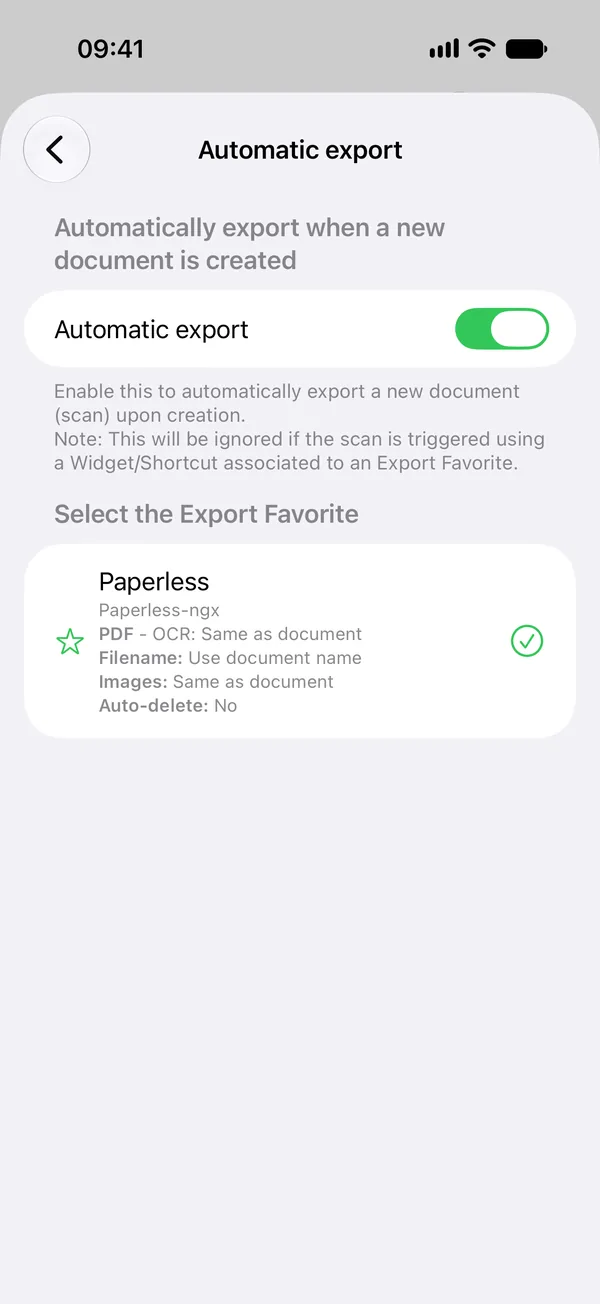
Automatic export saves the most time. Open it in Settings, turn it on and select your Paperless-ngx favorite. Every new scan then goes to Paperless-ngx as soon as it's created, without going through the export screen.
You can start a scan from Control Center, the Lock Screen, the Action button, a widget or the Shortcuts app. A widget or the Control Center button can also be linked to the favorite itself. Scans you start from it are uploaded to Paperless-ngx when you save them.
An Export Group sends a scan to several favorites at once, such as your Paperless-ngx favorite and one for iCloud Drive.

What Paperless-ngx receives
QuickScan uploads one PDF per document, much like a document scanner saving to the consume folder. Paperless-ngx fills in the rest.
- Title. When an upload comes without a title, Paperless-ngx uses the file name, minus the .pdf. So name your documents in QuickScan the way you want them titled, or let QuickScan do it. On iPhones with Apple Intelligence, its smart file names can include the date, issuer, type or title found in the document.
- Tags, correspondent, document type. Paperless-ngx sets them with its usual matching rules. For rules that only apply to uploads from apps like QuickScan, make a workflow with the Consumption Started trigger and the API Upload source.
- OCR. With OCR on in QuickScan, the PDF already contains its text. In its default OCR mode, Paperless-ngx sees that text and doesn't run OCR again, which is easier on a small server. If you'd rather leave OCR to Paperless-ngx, turn it off in the favorite's OCR setting. More on how that text gets into a PDF: how to make a PDF searchable on iPhone.
Your documents go straight to your server
There's no QuickScan account and no QuickScan server in between. The PDF goes from your iPhone to the address you entered. Scanning, OCR and smart file names all happen on the iPhone, and your token or password is kept in the iOS keychain.
A phone or a document scanner for Paperless-ngx?
When you're working through years of paper in one go, a sheet-fed document scanner that saves to a network folder (SMB or FTP), pointed at the Paperless-ngx consume folder, gets through the pile much faster than a phone.
For the daily trickle, a letter here and a receipt there, the phone tends to win. It's already in your pocket, and with automatic export the letter is in Paperless-ngx before it's back in its envelope.
The two work fine side by side. QuickScan can also save to SMB shares and WebDAV, in case you'd rather send everything through the consume folder.
Questions
Is QuickScan free?
For personal use, yes, and that includes uploading to Paperless-ngx. Every feature is free, and donations keep the updates coming. Businesses need QuickScan Enterprise, the licensed version sold through Apple Business Manager.
How do my scans get tags and a correspondent?
Paperless-ngx assigns tags, a correspondent and a document type when the file arrives, with its matching rules or your workflows, just as it does for files in the consume folder. QuickScan itself sends only the PDF.
Does it work away from home?
Yes, as long as your iPhone can reach the server when you send, either at a public HTTPS address or through a VPN to your home network (WireGuard, Tailscale and the like).
Does it matter where Paperless-ngx runs?
No. QuickScan only needs the address you open in your browser, and your login or a token. Docker on a NAS, a Raspberry Pi and a server you rent are all the same to it.
Is QuickScan made by the Paperless-ngx team?
No. QuickScan is an independent app from iSolid apps. Paperless-ngx is an open-source project run by its own community, and QuickScan talks to it through its REST API.
Related guides:
Try QuickScan for free
Scan on your iPhone or iPad, and send every new document straight to your Paperless-ngx server.